How to use Claro
While writing music in a DAW with plug-in synths, loops, and drum machines, source sounds all tend to take up lots of space across the spectrum. This can quickly lead to a very busy sounding mix. At this stage, a little bit of tone shaping goes a long way - if we can make what we're hearing a little closer to how a final mix could sound, we'll be able to make our musical choices with that final sound in mind.
If quick volume and EQ adjustments don't work to meld a new part with the existing instrumentation, perhaps the music would benefit from a different sound source or alternate melodic or chordal arrangement. Yet this is easy to lose sight of when we're able to dive down a rabbit hole of detailed EQ tweaking at any moment. We can find ourselves putting more time into tweaking a sound which struggles to fit than exploring the wider range of possibilities available by tweaking the instrumentation and the music itself.
A helpful approach is to use tools with fewer options while composing and different tools with more flexible options while mixing. However, if we can't see our early EQ moves that weren't quite right or are now causing a problem in the final mix, because they're in a different plugin than the one we're using to finesse, the experience is more difficult to learn from. Building intuition takes longer. With that in mind, Claro allows its flexibility to unfold over time. We don't need to ignore it in the early stages, or switch back and forth between tools in the later stages.
If we start with Claro, we can use it all the way through to the end.
Produce
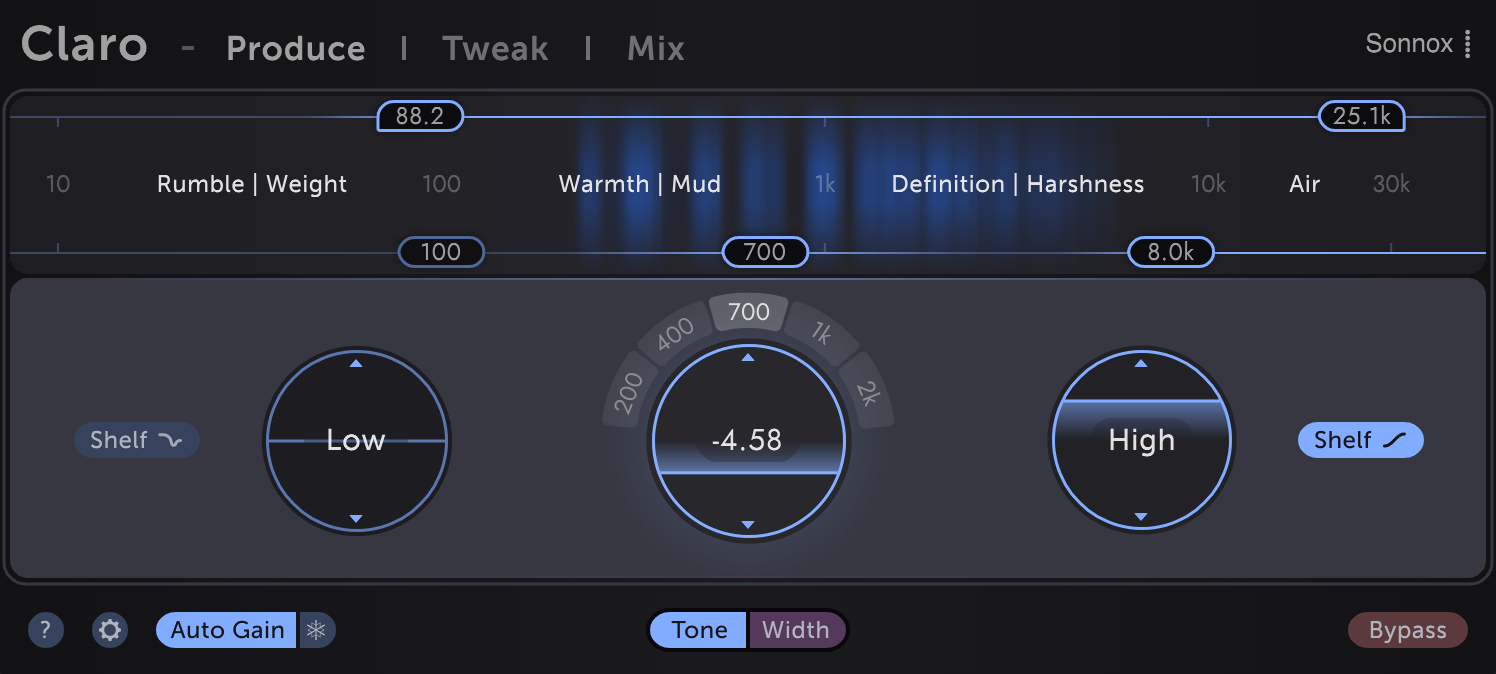
Gut feeling is the key here. We can see immediately where in the spectrum the sound's energy is vs where we would like it to be - not just in terms of Hz, but in the language we usually use to describe sounds. Just drag a horizontal slider towards Definition, if that's what we want more or less of, then drag the circular gain control up and down to taste.
The same goes for the low and high cut filters above the energy meter. Just drag the left-hand Low Cut slider to the right to remove low end rumble or reduce weight and mud.
Frequency shortcuts
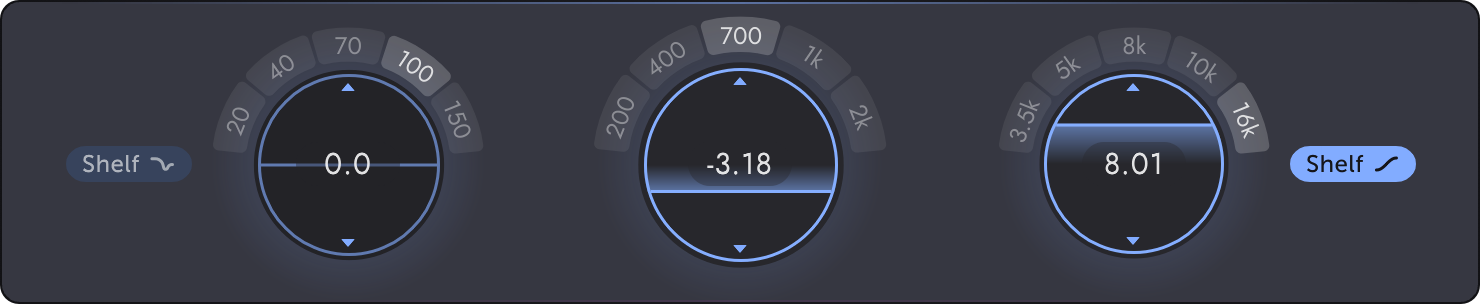
The set options for each band are inspired by various popular analogue EQs. They've been chosen because they're frequently useful and are often a great starting point - close enough while composing and mixing quickly and fully adjustable later on in Tweak and Mix views.
For anyone with an existing intuition for the sound of EQ moves in specific frequency ranges, these hover shortcuts can be even faster than the sliders. And using them is a great way to build that intuition!
Shelving modes
Enable the Low band  for rumbly low end enhancement without the mud of a typical shelving EQ (a lot like the classic Pultec push/pull trick!). In Tweak/Mix views this behaviour is available for all bands by switching them into Shelf Shape and increasing the Overshoot control (more about this later)
Enable the High band  for smooth airy boosts or subtle high end softening. The Slope is gentler than a typical shelving EQ, so can be pushed/pulled harder without harshness or dullness.
Tone and Width
On stereo tracks a Tone | Width button appears in the plugin footer. Toggle it to switch Produce view between overall stereo Tone shaping and stereo Width shaping.
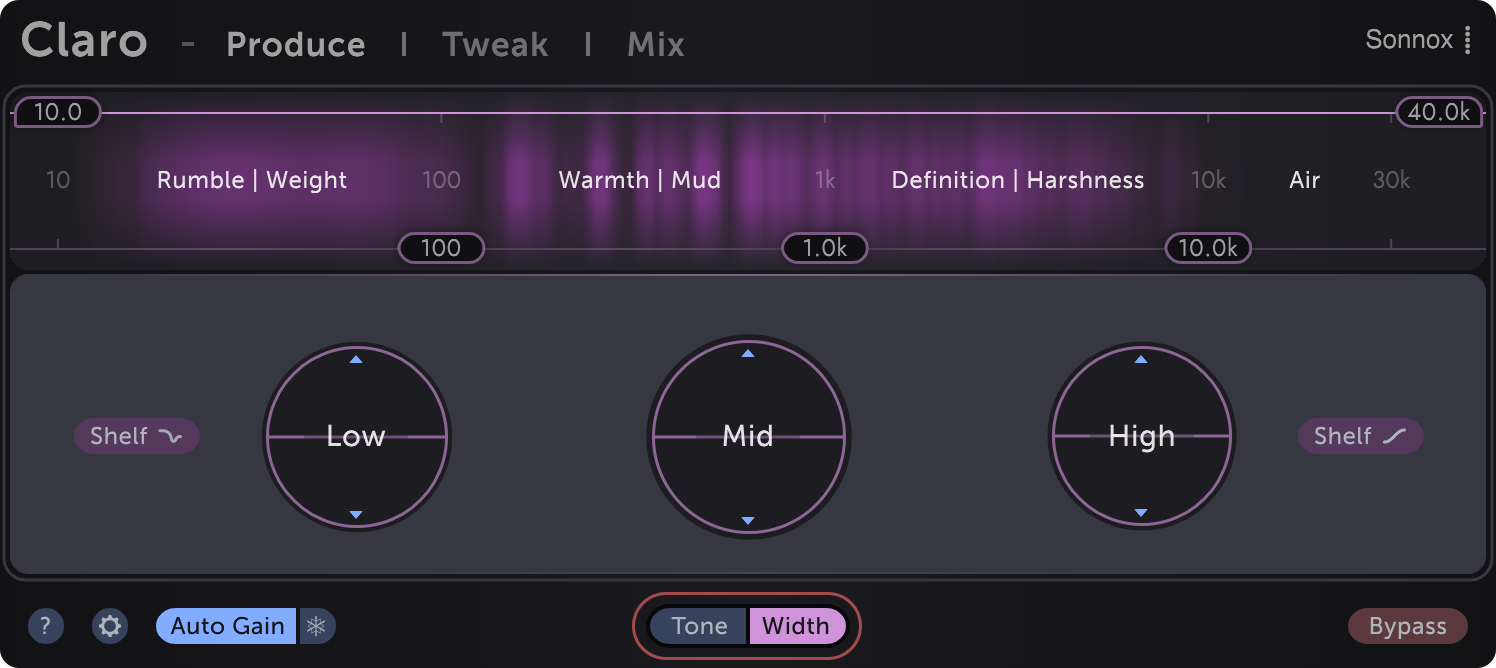
Bright Width metering shows regions of the spectrum with wide stereo image, while dark areas show where the signal is narrow (or mono). Bands that boost or cut in regions with little or no Width will sound like they're bypassed.
Width bands apply EQ to only the "side" channel - attenuate a band to narrow the stereo image in that area of the spectrum, or boost to widen it. Do be careful when boosting - a little goes a long way! See the Stereo tone shaping section for more information about "mid / side" EQ and how to get the most from it.
Mono-ing the low end
Here the Width meter shows a sound with wide stereo image across the spectrum:

The low end Width energy around Rumble | Weight can be removed simply by dragging the Low Cut filter to the right. This is often a good thing to do on stereo instruments whose low end energy isn't fundamental to the bottom-end groove or ambience of the mix.
Tweak
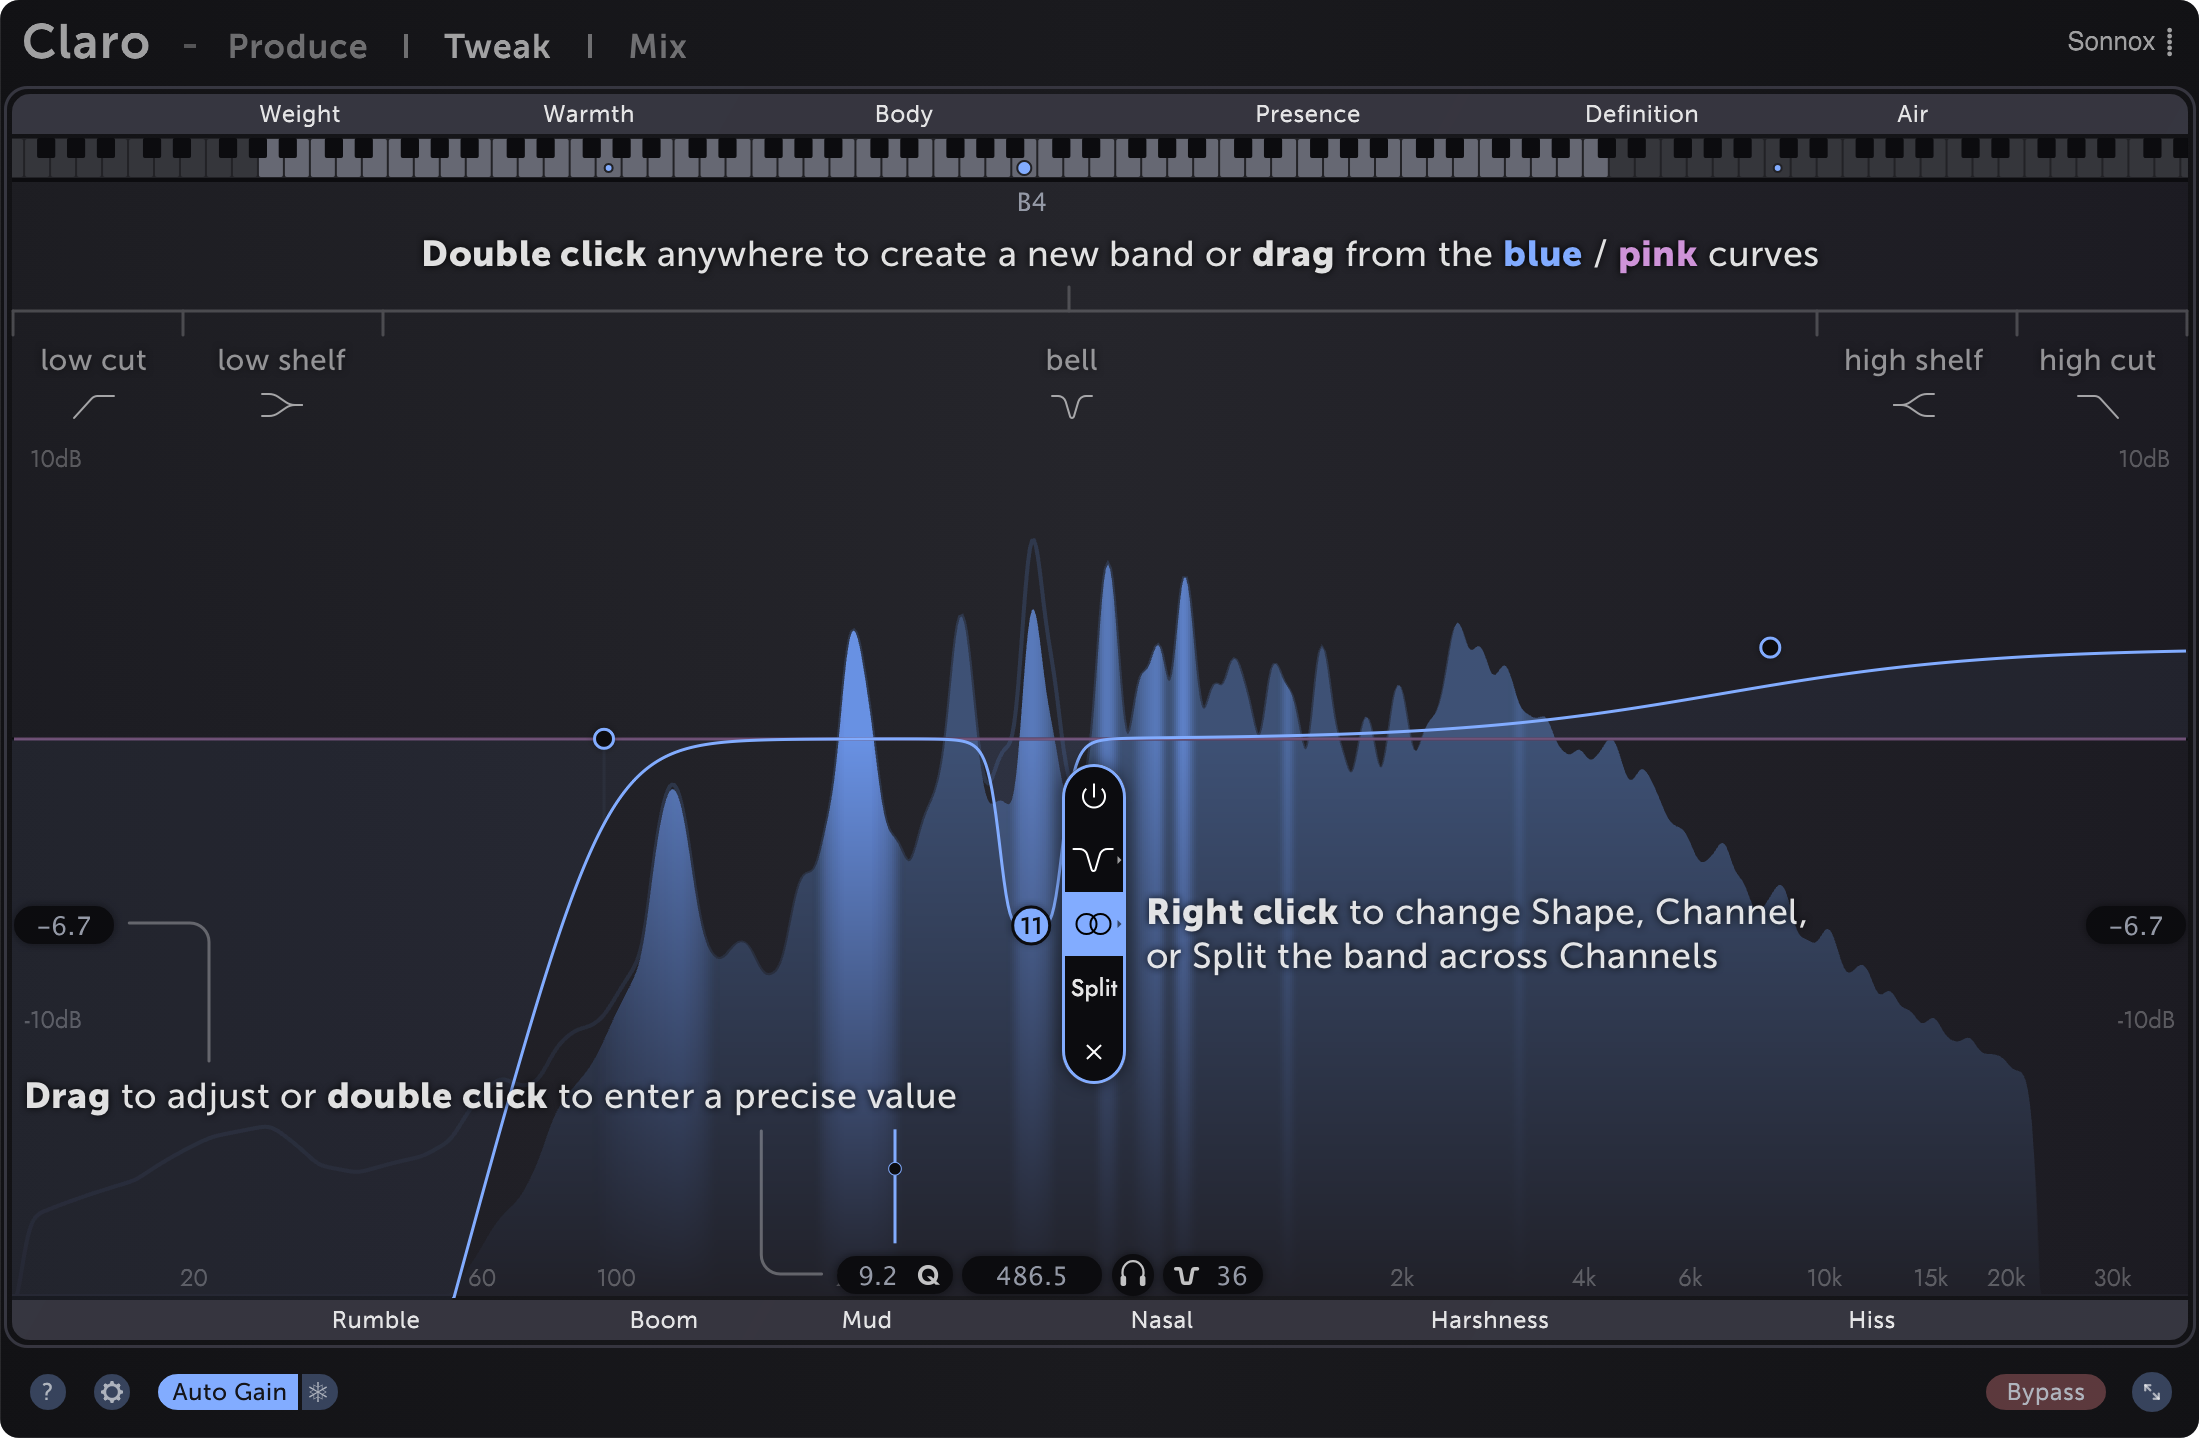
When you need to get really surgical, dive into Tweak view!
All of your tone shaping moves from Produce view are carried over and can be further adjusted, and up to 16 additional bands can be added.
EQ controls
When multiple bands are selected, Gain, Frequency, Q, and Slope are adjusted relatively while Shape and Channel are adjusted absolutely.
Band Right Click menu
- Bypass bands
Double Clicka band's handle to toggle Bypass or click
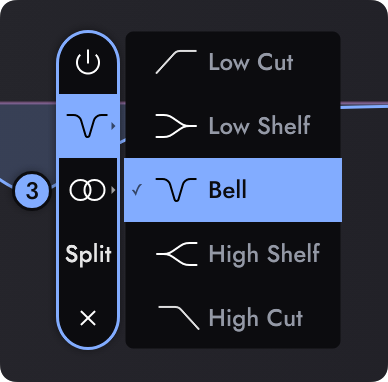
- Shape
- Low Cut: Removes all sound below the band's Frequency
- Low Shelf: Boost or attenuate low frequency sound
- Bell: Boost or attenuate either side of the band's Frequency
- High Shelf: Boost or attenuate high frequency sound
- High Cut: Remove all sound above the band's Frequency
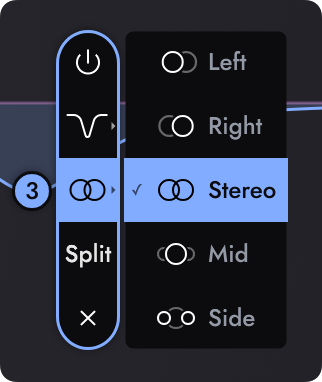
- Channel (stereo tracks only)
- Applies the band's processing only to the selected channel. See Stereo tone shaping for details.
- Split (stereo tracks only)
- Splits the band across two channels.
- A Stereo/Left/Right band splits into → Left & Right
- A Mid/Side band splits into → Mid & Side
- Delete a band
- Click the
 button.
Floating controls

- Gain (dB)

- Gain (dB) controls float on the left and right sides of the EQ display, in line with the selected band
Dragvertically to adjust the band's Gain without adjusting Frequency, orDouble Clickto enter a precise value.- Frequency (Hz, Note) Q control


- Frequency (Hz, Note) controls float below and above the selected band
Dragleft/right to adjust the band's Frequency without adjusting Gain, orDouble Clickto enter a precise value in Hz or as a Note value.- Q control

- Adjusts how wide a Bell band is across the frequency range, and how much resonant boost a Low or High Cut filter band has at its cutoff frequency
Scroll,Command Drag(macOS), orControl Drag(Windows) and Bell band's handle to adjust its Q.Draga Low/High Cut band's handle vertically to adjust its Q.- Slope control


- Adjusts how steep the edges of a band's curve are. Use a Slope ot 6 (dB/octave) for smooth and subtle shaping, 12 to match the sound of a typical EQ, and higher Slopes up to 120 for extremely precise spectral tweaking.
Scroll,Command Drag(macOS), orControl Drag(Windows) and Low/High Cut band's handle to adjust its Slope.- Shelf Overshoot

- Overshoot replaces the Q control for Shelf bands. Increasing the Overshoot creates a dip on the other side of the shelf boost (or vice versa). A setting of 0% has no overshoot, and behaves like a typical EQ shelf. Settings around 50% mimic the behaviour of some analogue EQs renowned for their "musical" qualities.
Scroll,Command Drag(macOS), orControl Drag(Windows) a Shelf band's handle to adjust its Q.- Listen

Dragthe Listen control to solo the region around the selected EQ bnad. This can be helpful when exploring the contribution of certain parts of a sound to the rest of the mix, and when exploring with the aid of the resonance metering.Alt Draggingany EQ band's handle in the graph also activates Listen mode.- While Listen is active,
drag verticallyto adjust the Listen volume without changing the band's EQ gain. - Precise control
Shift Dragany control to adjust it with greater precision.Double Clickany numeric label to enter a precise value with the keyboard.
Piano note value display

This display shows the note value of the current band's centre Frequency. Double Click the value to enter a note value to set the band to.
Adaptive spectral metering
Claro's spectral metering adapts to your EQ moves to always show the most useful information - whether you're tweaking overall tonal balance or resonance-hunting, on the stereo channel or on left, right, mid or side sub-channels.
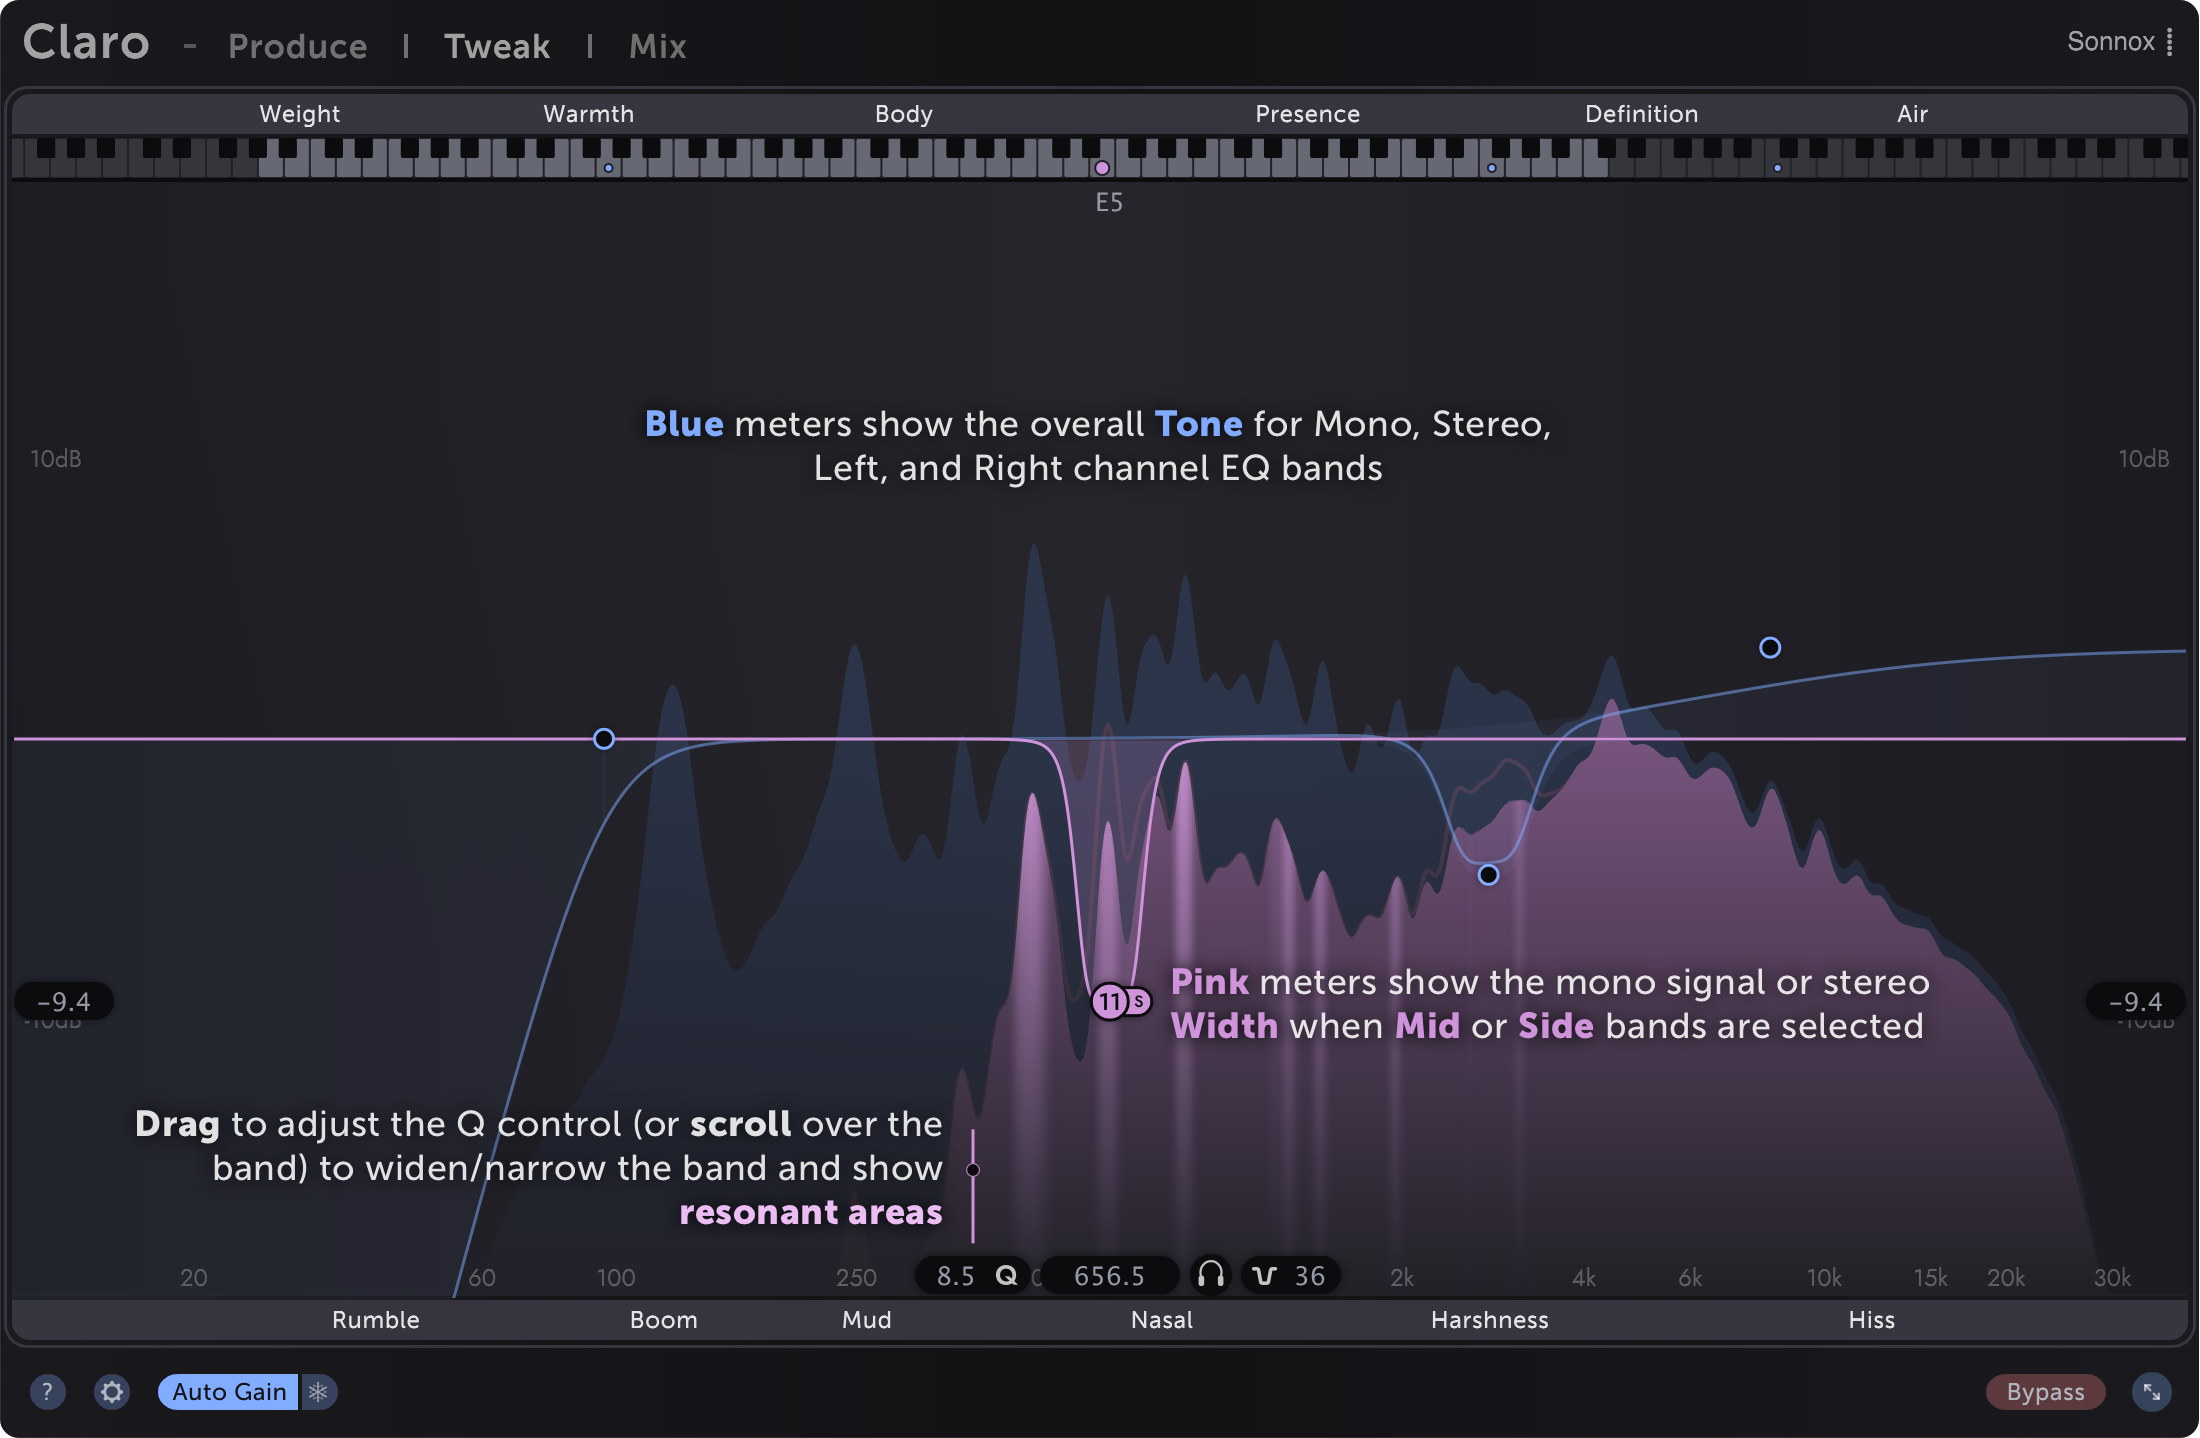
Resonances
When adjusting overall tonal balance with a wide Bell or Shelf band, the meter becomes slow and smooth, showing the overall balance of the spectrum. When searching for resonant areas to tweak, the meter shows precise peaks, and the peaks which resonate most over time are highlighted.
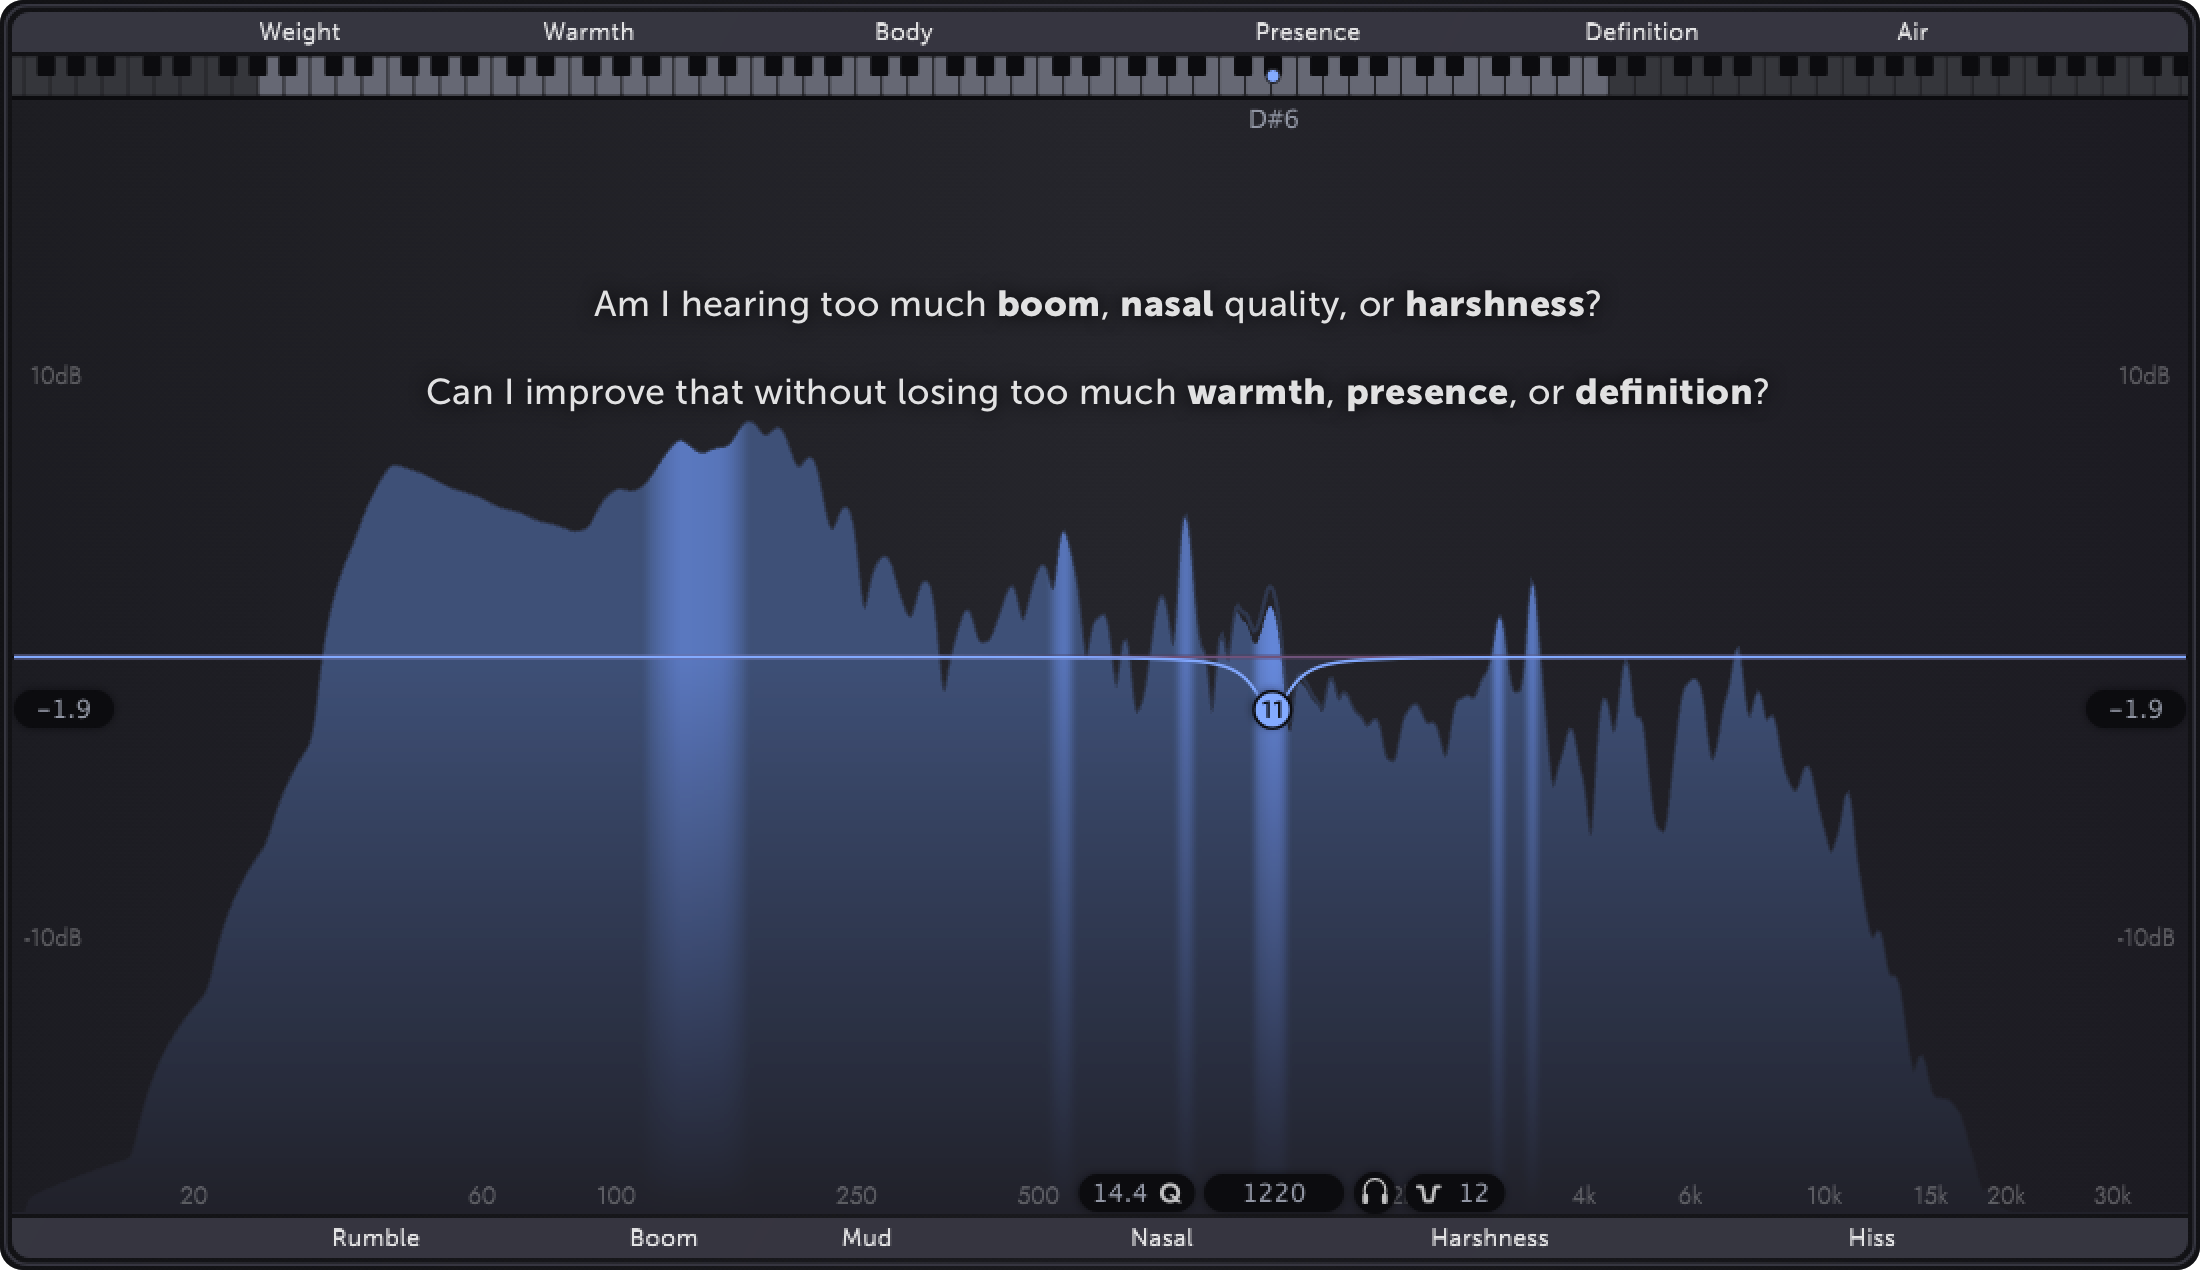
What does resonance mean? These are the sharp, tonal characteristics of some signals which ring over time, like the overtones of a bell. They're present in most sounds, and help determine that sound's character, including its pitch. Sometimes, though, such areas can give the sound a boxy or harsh character that we would prefer to reduce.
It's common to find these unwanted resonances by boosting with a narrow Bell band and sweeping the Frequency up and down. The idea is that the resonances we want to reduce will jump out the most, showing us where to place our EQ band. In practice, though, this approach has downsides.
In short, all parts of a signal tend to sound quite bad when sweeping a narrow boost. And when we decide where to place our EQ cut, we've just been listening to an exagerrated version of the "problem" area. The result: it's still often difficult to find the areas we're looking for, and we can over-attenuate because we've primed ourselves by boosting first.
With Claro, there's no need to work around these downsides. Simply grab a Bell band and scroll to narrow the Q. Then think, for example:
Defaulting to Tweak view
If you tend to use Claro for later-stage mixing projects and always want to dive right into the details in Tweak view, simply toggle the option in Preferences.
Mix
Claro's Mix view contains all the information you need to understand and assemble your mix. All Claro instances in your project are displayed in context for you to prioritise, allocate space, explore interactions and quickly mitigate excessive overlaps.
A single Claro Mix view allows you to very quickly explore your entire mix and tweak any two Claro instances at the same time without needing to find and juggle many plugin windows.
Workflow
There are four key sections in Mix view:
- The track list on the left
- The Reference Track EQ slot (top). To change the Reference Track
Clickthe yellow star in the track list orDragthe track onto the top EQ slot. - The Working Track EQ slot (bottom): To change the Working Track
clickanywhere in the body of a different track in the list orDragthe track onto the bottom EQ slot - The footer, which contains features specific to Mix view
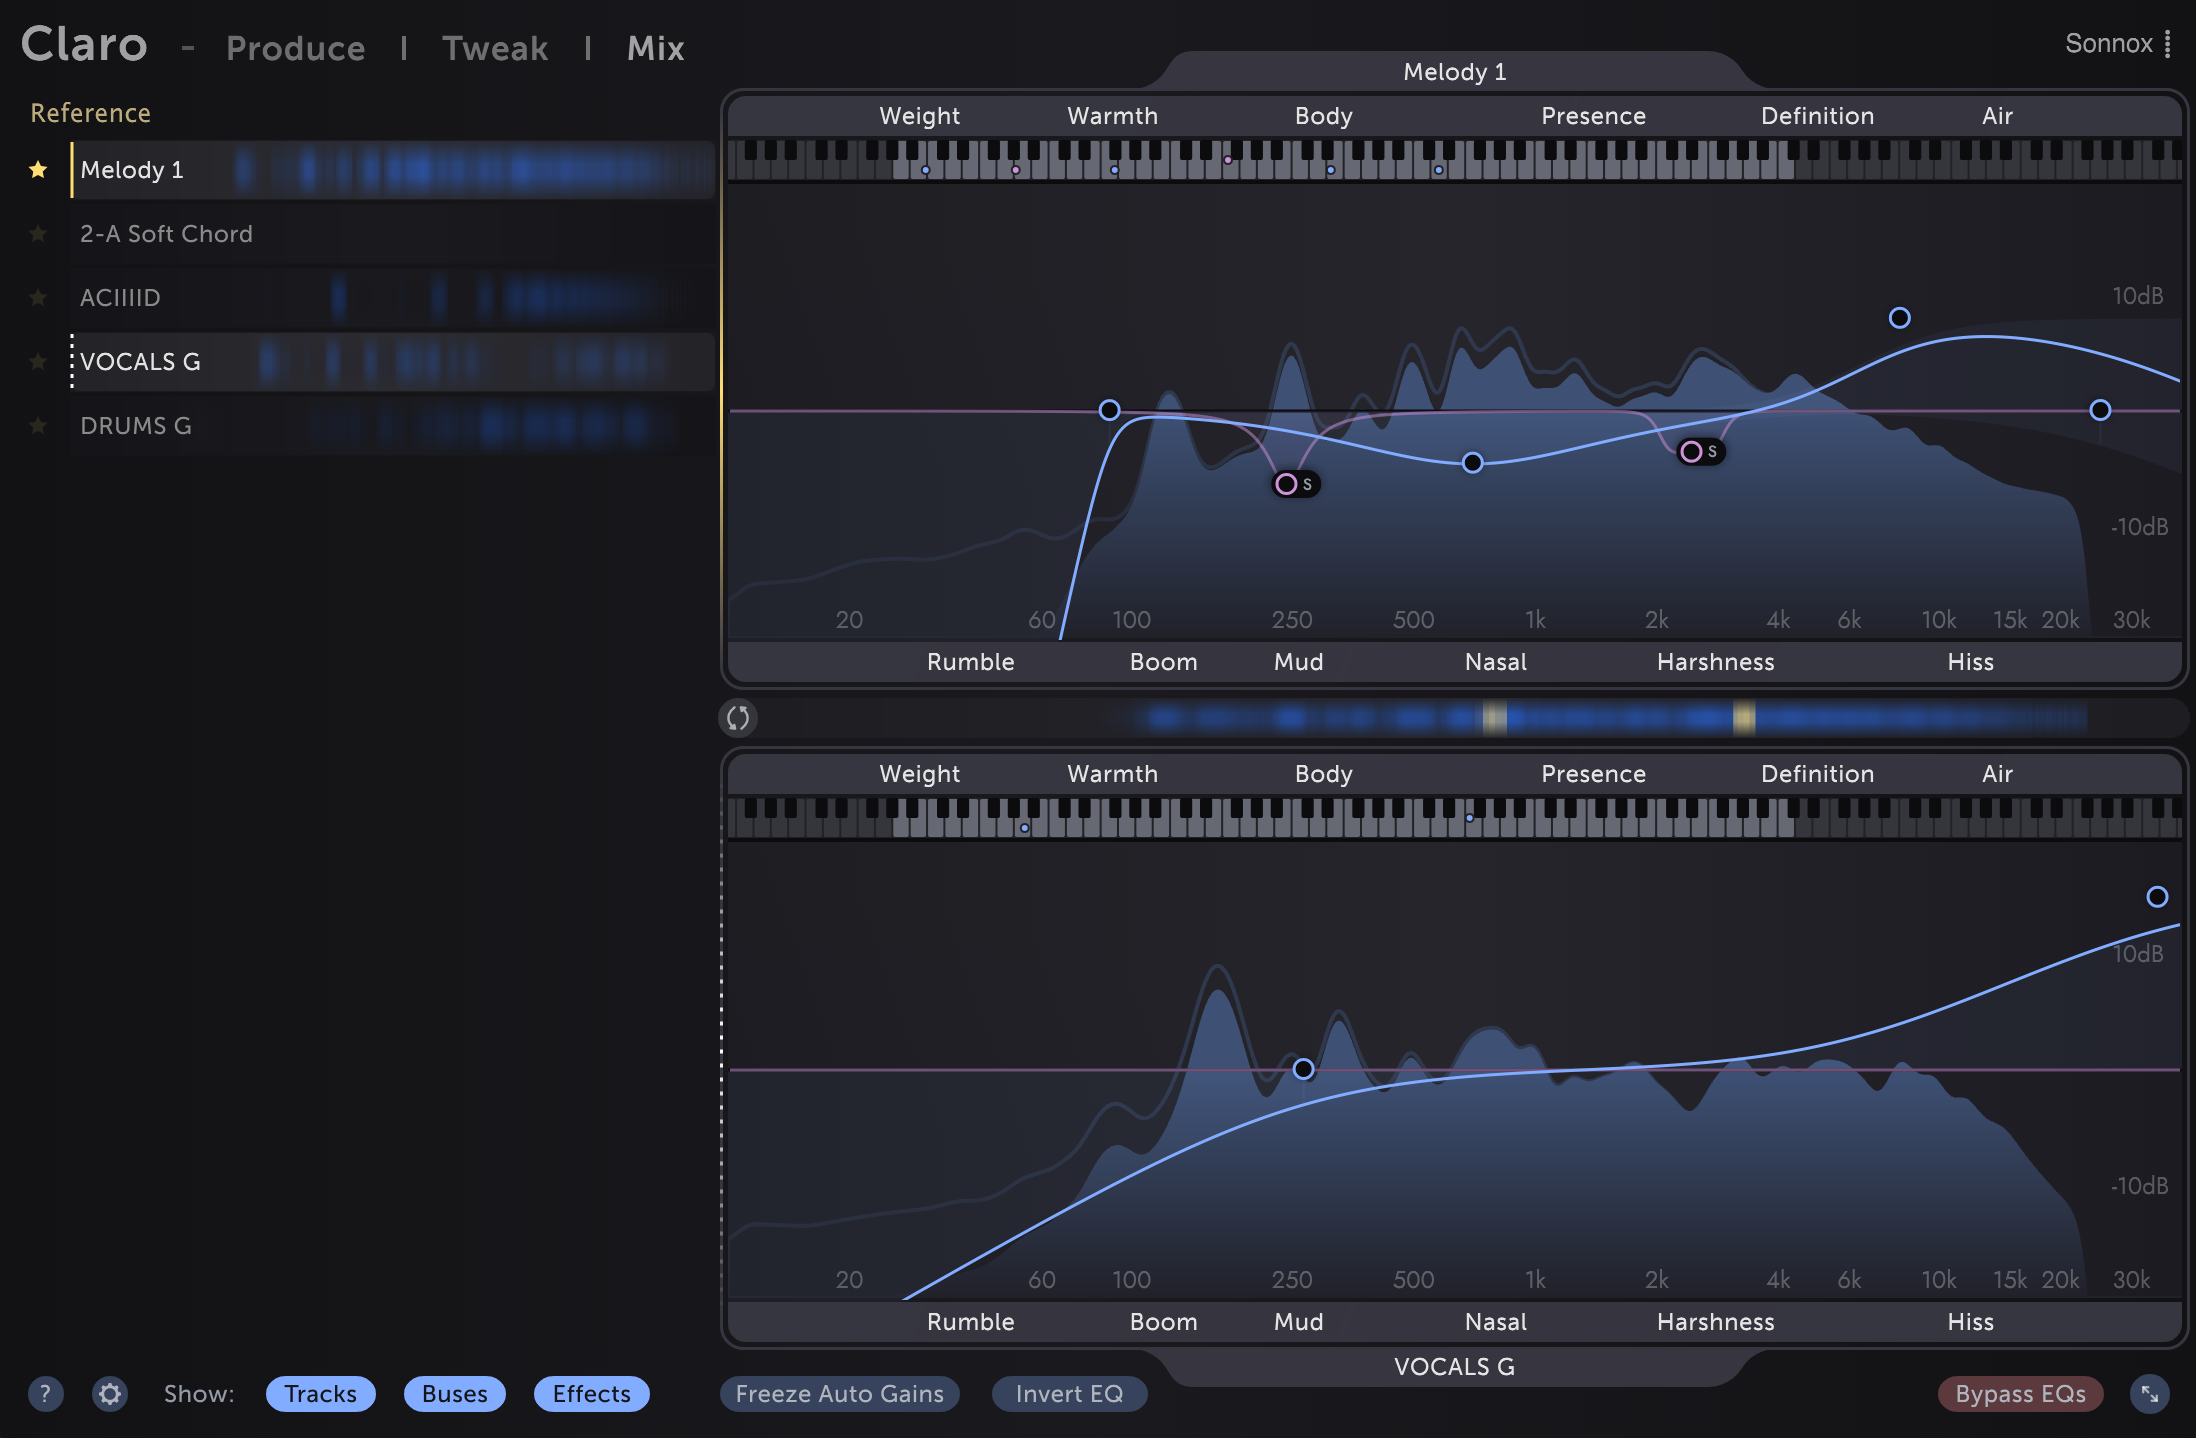
The left-hand track list shows the spectral energy of all tracks on which Claro is used. Blue meter areas show the overall energy of that track, just like the Produce view metering. Yellow meter areas show where that track overlaps with the energy of your Reference Track enough that their combination might sound muddy, harsh, or otherwise make the Reference Track more difficult to hear.
Any track that shows large or numerous yellow overlap areas is a good candidate to load into the Working EQ slot, so that its tone can be tweaked alongside the Reference Track.
Overlap metering and masking
The yellow overlap areas show where the Reference Track and Working Track are overlapping enough that the Reference is struggling to cut through the mix. Sometimes these excessive overlaps are called "collisions" or, more precisely, "spectral masking".
Masking occurs when a frequency range of one signal is sufficiently louder than the same frequency range in a second signal such that our ear-brain system doesn't notice that frequency range in the quieter signal. This is why we can have the experience of a single track being easily audible when solo'd but difficult to hear clearly in the full mix.
In a sense, all mix elements compete for attention and one of our jobs while mixing is to make sure that the right elements win at the right moments, while keeping the overall tone of the full mix balanced.
A good way to approach this in Claro's Mix view is to
- Decide which track should lead in each frequency range. For example, you might want a lead melody part or vocal to lead in the Body → Presence range
- Start by setting that track as your Reference
- Check the track list for other tracks which show yellow overlaps
- Load one into the Working track EQ slot and tweak both EQs to taste, then load another and repeat
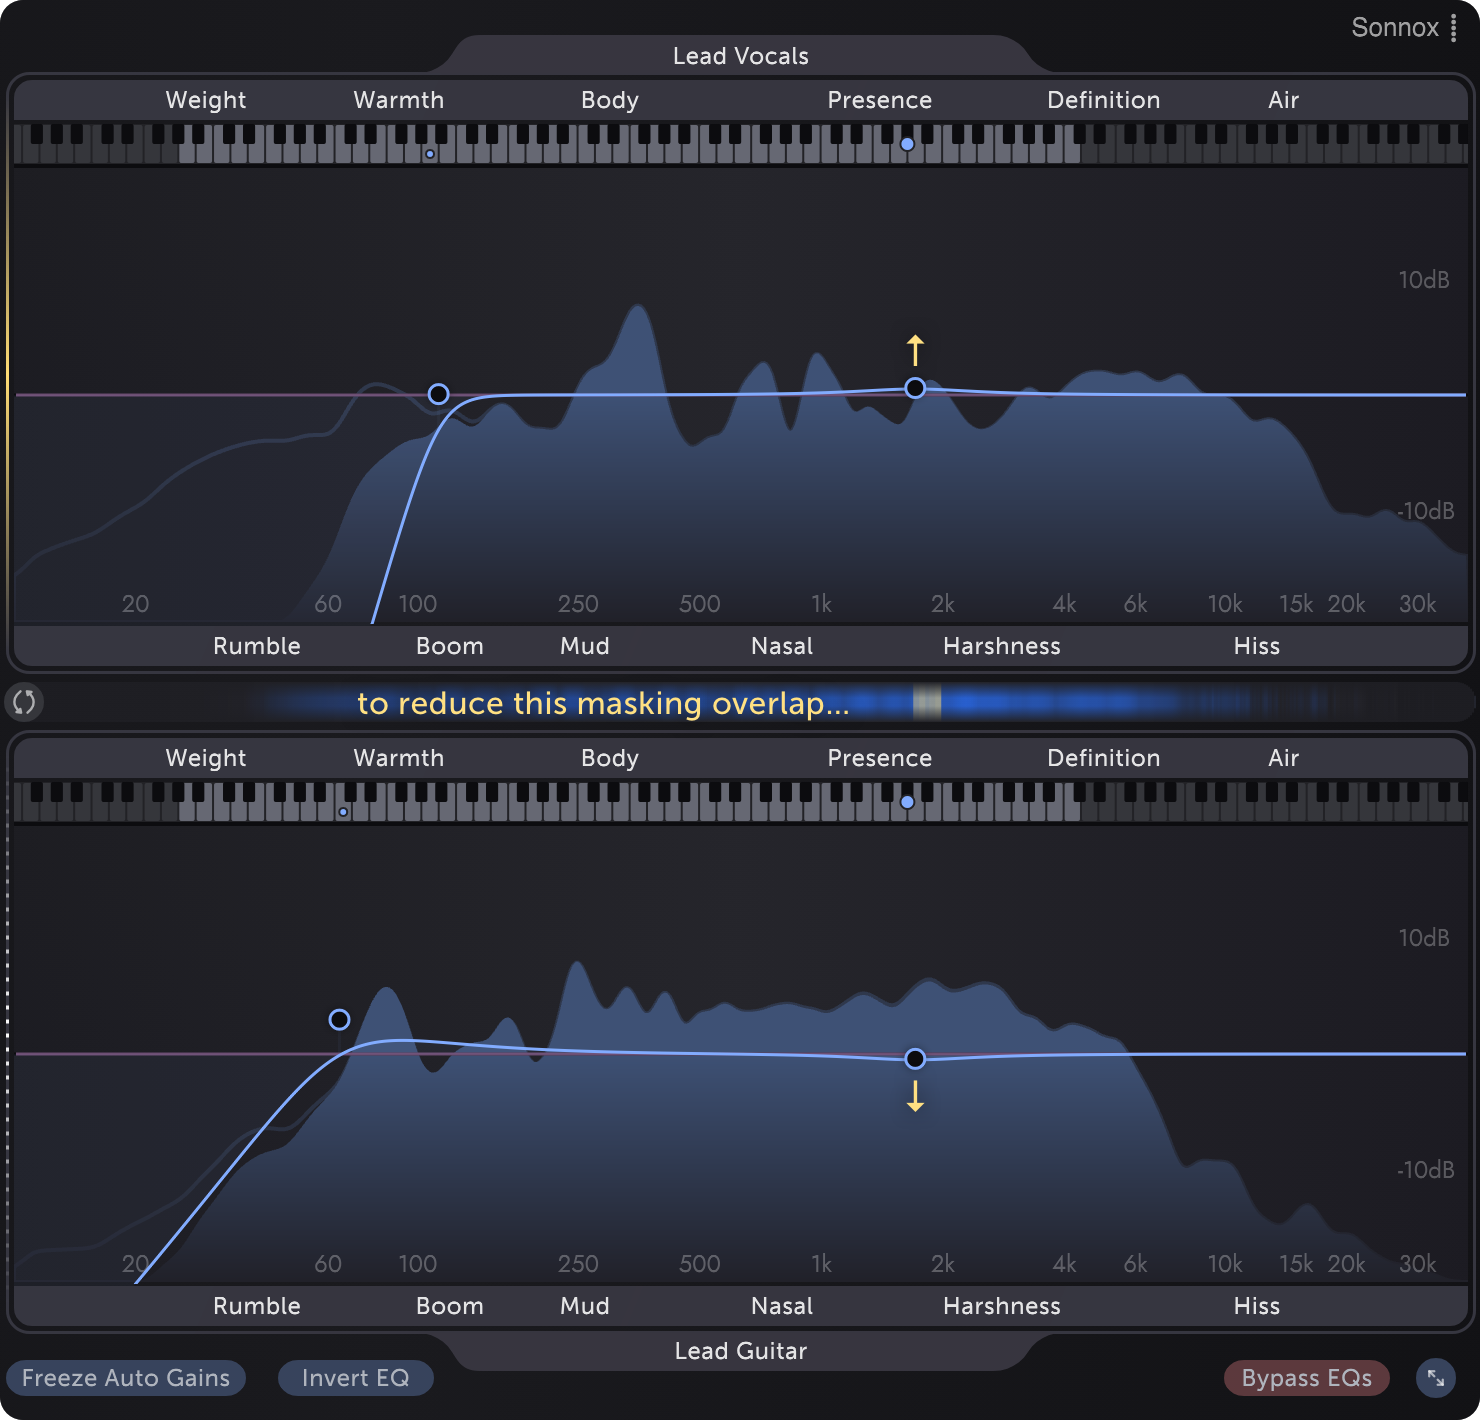
By tweaking overlapping tracks to create space for the lead melody to sit in we can avoid counter-productive moves such as making that lead melody line easier to hear by turning it up or boosting its Presence, both of which might unbalance the mix.
Sometimes it's even more effective to do a little of both - enhance the lead's Presence while attenuating the same range on overlapping tracks. See Invert EQ moves for a way to make this easier.
Masking is not always bad
All mixes, including our favourites, contain lots of masking. Instruments and voices overlapping helps the mix blend together with character that is greater than the sum of its parts.
- Less masking makes elements sound more distinct. This can be desirable, for example when we want melodies and lyrics to be highly intelligible, or when the groove of the music relies on the interplay between kick and bass in the Warmth → Body range.
- More masking can make elements sound less distinct from each other, as if they're blending together. This can be desirable too, for example if we want melodies and lyrics to sound embedded deep in the mix, rather than floating on top of it, to enhance the intensity of the music.
Which direction to tweak towards is up to you. Claro aims to make overlaps and masking visible and enable you to explore whether they're helping achieve the sound that you want.
Should Claro always be the last plugin on each track?
Ideally yes, so that the overlap metering shows the actual signals that you are hearing, rather than those signals before other plug processing.
But don't wory, you don't need to move Claro instances that you used early on - this could change the behaviour of the other processing on that track.
When you want to start tweaking overlaps between tracks, and if Claro isn't already the last insert on a track, just add another instance at the end of the track's plugin chain. That track will show in Claro's Mix view as a folder of multiple instances, and the one you just added will automatically be used when setting that track as your Reference or Working EQ.
Can I still use my faders?
Please do! Claro's Mix view metering is scaled by your DAW faders to match what you're hearing, rather than matching the pre-fader track volume. And the overlap metering is always relative to the Reference Track.
So, if you need to turn everything down towards the end of a mix, you can do so with a gain plugin before all Claro instances, or by pulling all of the DAW faders down by the same amount - without affecting the overlap metering. See Compatibility for details about your DAW.
This also means that your DAW faders can be used to reduce the masking that you're seeing and hearing. For example, the amount of masking between this lead vocal track and other mix elements suggests that the vocal is too quiet.
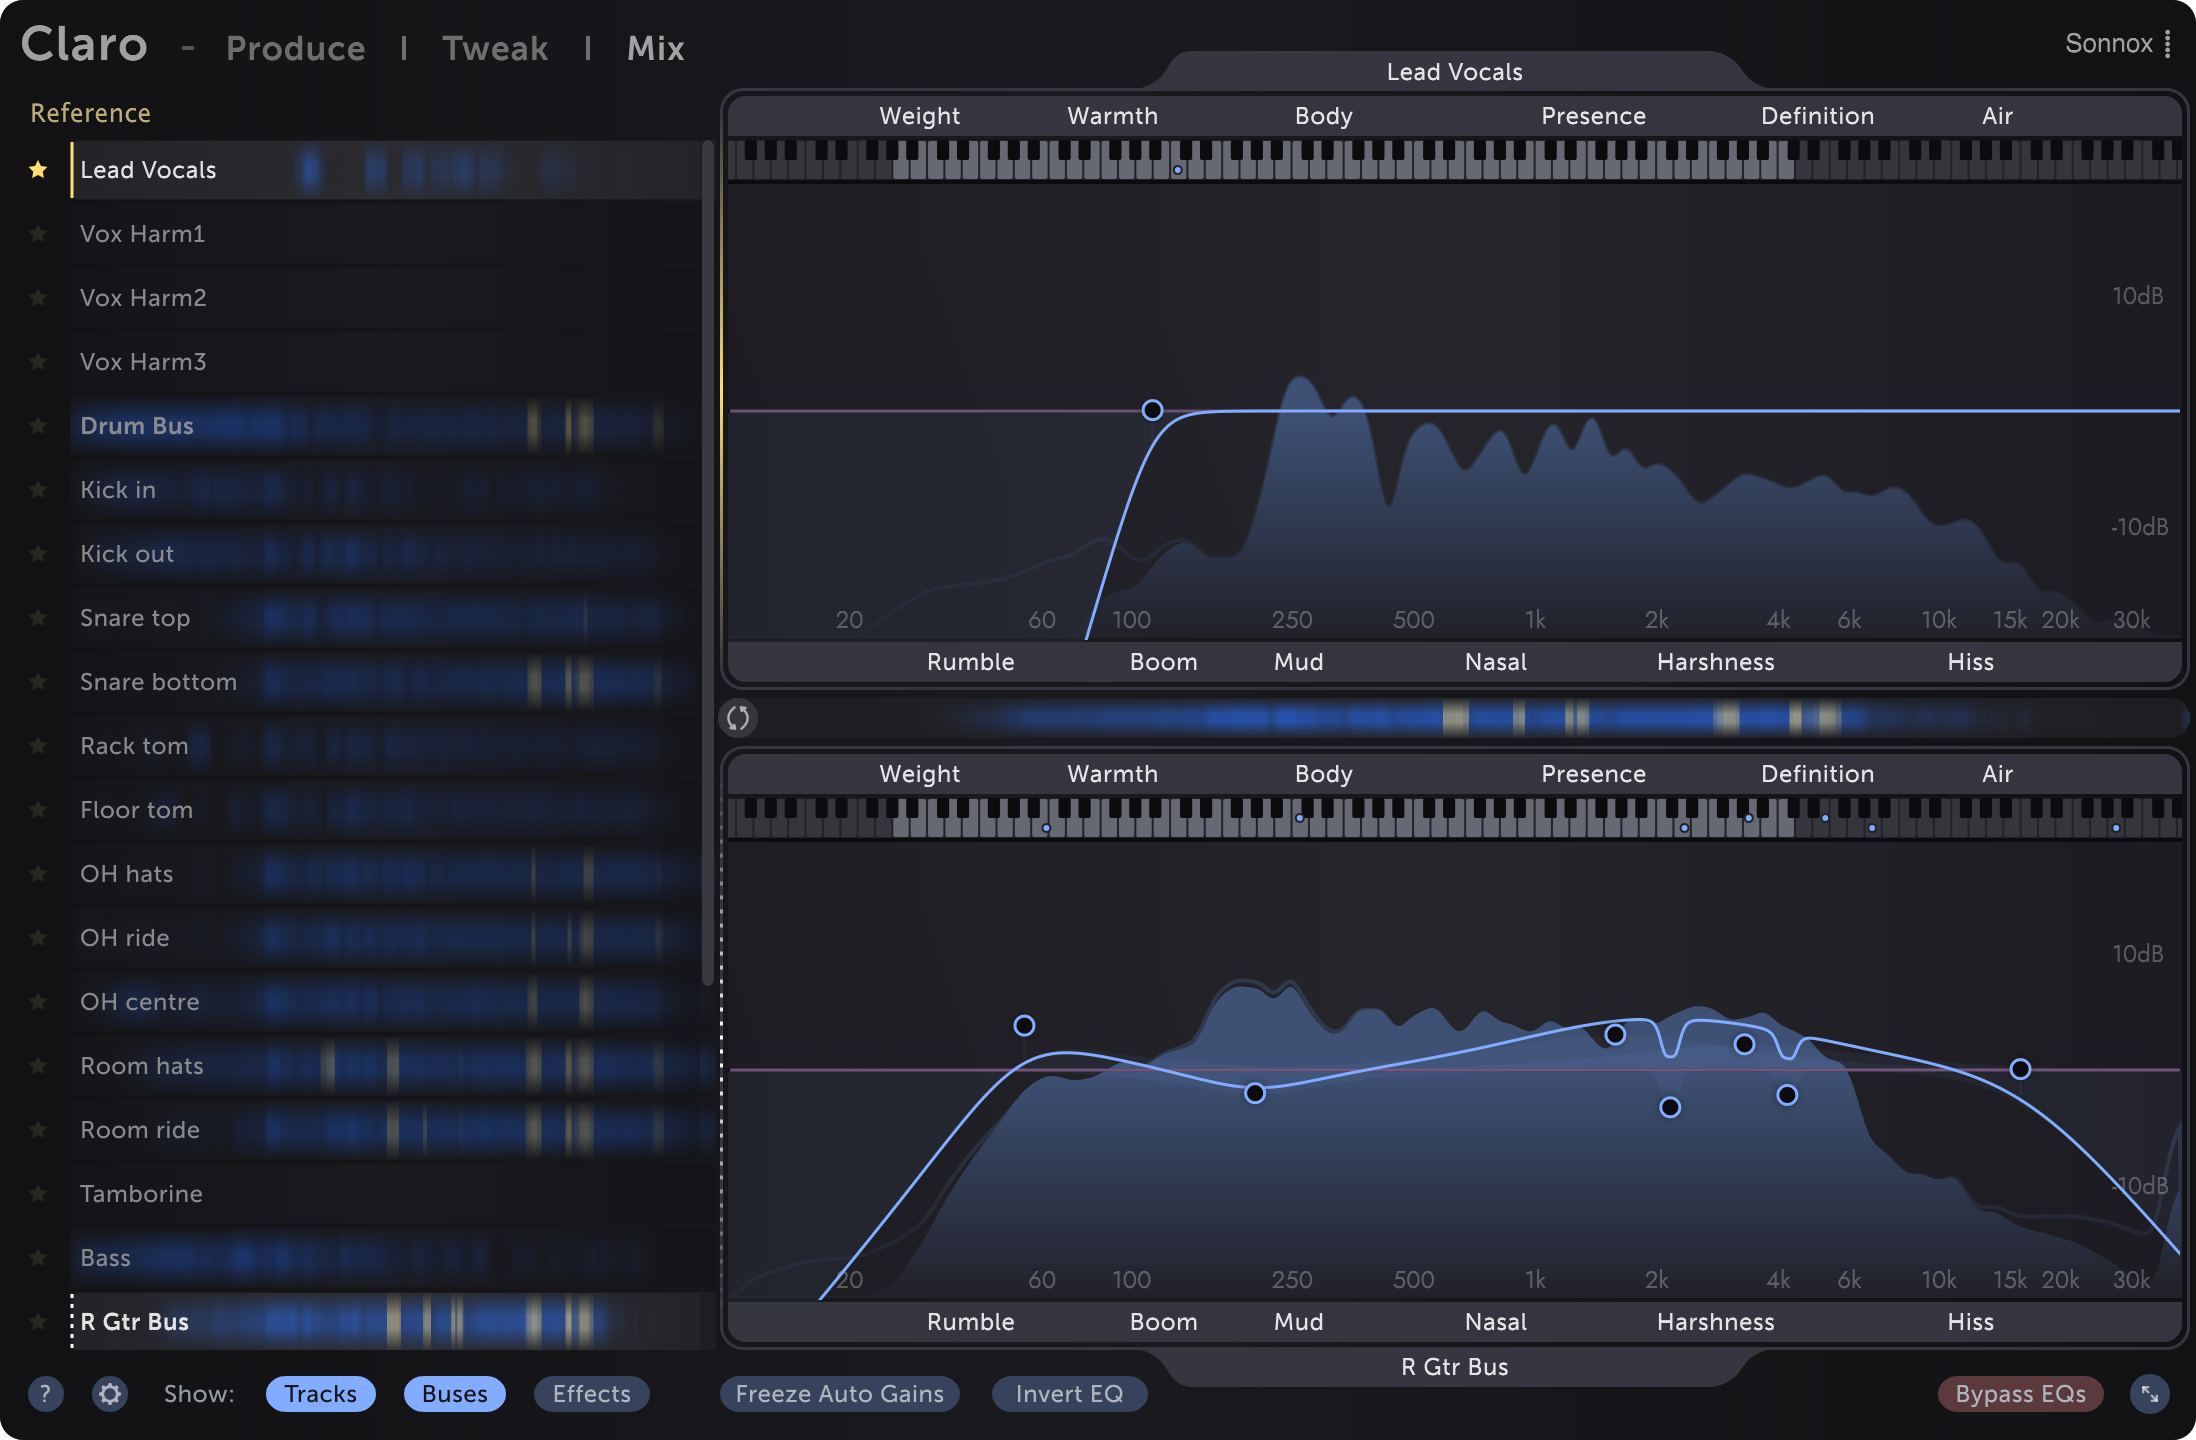
In this case, pushing the lead vocal track's fader up might be a more effective first move than boosting its Presence or attenuating the Presence of other tracks. If this vocal was already sitting at the volume you want, but still wasn't intelligible enough, tweaking the balance of Presence across multiple tracks would help.
Tip: Excessive masking of lead elements suggests that an alternate musical arrangement may be even more effective than volume or tone tweaking.
Invert EQ moves
Boosting on one track and attenuating on the other can reduce excessive overlaps while changing the tone of each track less. This is because less EQ gain is required on each track to create the same amount of difference betwen them.
To do this quickly in Claro, enable the  button and EQ as normal.
When enabled, all EQ adjustments are mirrored on the other instance with inverse gain.
Tracks / Buses / Effects visibility

When working on a mix with many tracks, buses, and auxiliary effects returns the track list filtering buttons in the footer allow you to hide track types that you don't want to see yet.
For example, you might want to start with only Buses visible for a top-down mixing approach - explore overlaps and subtle EQ tweaks across buses before stepping down to the level of tracks. Or you might prefer the opposite bottom-up approach, starting with just the Tracks visible!
Or you might find that Reverb and Delay Effects returns seem to significantly overlap with all other tracks, and therefore not want to see their metering all the time. Remember, masking is not always bad.
Claro categorises tracks by the track type in the DAW, or based on the name of the track where the track type is not available. See Compatibility for details.
Bypass EQs
 temporarily bypasses both of the loaded tracks' Claro instances.
The button is non-latching to prevent instances from being left bypassed by accident when different tracks are loaded into the Reference and Working slots.