How to use ListenHub

Our listening environments (speakers, rooms, and headphones) each have unique quirks that we must learn to listen through and workaround. Without consistent listening habits, these quirks are difficult to learn.
Listening to the same thing on repeat - this is what happens to us when we lose all objectivity; we become fixated on some details and miss others altogether. The bigger picture, the mix and the music are entirely lost. ListenHub gives you the perceptual resets and consistency required, so you can hear with fresh ears again.
Perceptual resets
- A/B against your favourite songs to hear how your mix compares. Automatically loudness match directly from Spotify, Apple Music etc. without downloading and importing audio files
- Solo different stereo channels and frequency bands to hear overlooked details and gain a fresh perspective
Consistency
- Stepped volume control for quick, repeatable monitoring loudness and more consistent mixing decisions
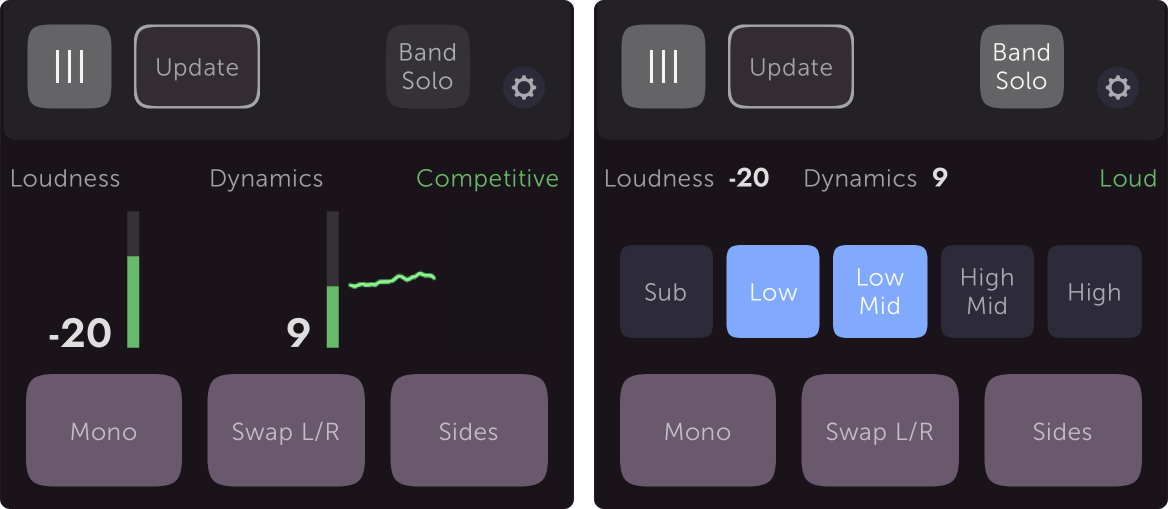
- Simple loudness and dynamics metering to keep you grounded. Stay green to stay competitive, though squashing things into the yellow for a few seconds in the louder sections is OK!
This works via a mobile app that controls a macOS systemwide audio device and/or plugin.
Components
Mobile app
The mobile app (iOS, Android) connects to and controls either the macOS desktop app or the plugin.
Open the app and follow the on-screen instructions. If you ever want the app to connect to a different computer just tap the settings button 
macOS desktop app and systemwide audio device
The macOS desktop app runs in your menu bar ![]() and controls the systemwide audio device, just like the desktop app/mixer window for your audio interfaces. It can be controlled by the mobile app or by its own desktop window.
and controls the systemwide audio device, just like the desktop app/mixer window for your audio interfaces. It can be controlled by the mobile app or by its own desktop window.
When the desktop app is not running - not visible in your menu bar, ListenHub's audio drivers will not be running either, also the mobile app will be unable to connect and FX Chain plugin processing will be inactive.
Launching the desktop app at login / reboot
macOS main menu bar → ListenHub → Preferences → Enable "Launch ListenHub at login"
DAW plugin
The plugin sits on a track in your DAW and can be controlled by the mobile app.
Insert the plugin in the final slot of your mix/master bus. Or, if your DAW allows it, insert the plugin after the mix/bounce bus to ensure that your monitor control processing cannot affect your bounced mixes.
See How to use a listen bus in your DAW if you aren't sure how to do this.
The ListenHub plugin will bypass itself when your DAW is bouncing/rendering a mix to file. However, this does not work in all DAWs. See Compatibility for details.
Volume controls
Since our perception of frequency balance changes with loudness, we will be able to make more consistent mixing and mastering decisions when we choose our listening loudness intentionally. This includes:
- defaulting to the same comfortable loudness for most listening; not too loud, not too quiet
- switching to repeatable louder and quieter levels when making certain kinds of decisions
ListenHub's stepped volume makes this easier than marking positions on your audio interface or monitor controller volume control!
Try switching to Soft when setting fader levels across a mix and tweaking compressors, and Loud when editing, producing, or composing.
Volume setting vs dB level
| Volume | dB level |
|---|---|
| Loud | 0 |
| Normal | -6 |
| Quiet | -12 |
| Soft | -18 |
Enabling the Dim button applies an additional -12 dB attenuation to the selected volume setting.
For safety, ListenHub's Loud volume setting applies no boost or attenuation: 0 dB. We recommend initially selecting Normal volume and turning your speakers up by about 6 dB so that Normal is as loud as your normal listening volume before using ListenHub.
This gives you an additional 6 dB boost, with the Loud setting, for use while checking soloed tracks and editing - without any risk of overloading your audio interface.
Auto mute
To protect your ears and speakers, ListenHub automatically mutes itself if the output loudness will be higher than +12 dB. The mute happens immediately, preventing any excessively loud signal from escaping.
The auto-mute level can be raised or lowered in the preferences page
Metering
Loudness and Dynamics
Why it's not necessary to crush dynamics to sound competitive or mix/master to loudness targets, and what we can do instead.
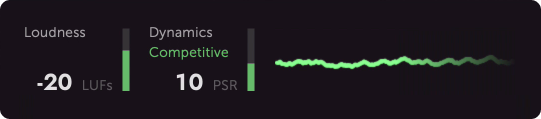
Summary: What we most care about is whether our music will sound as exciting and powerful or as calm and soothing (or anywhere between) as the other music our fans will choose to listen to. To do this with ListenHub: Make all the loudest sections similar in Loudness and balance quieter sections to taste. Keep Dynamics green to stay competitive, though squashing into the yellow for a few seconds is OK!
Loudness and LUFS
Loudness is typically measured in LUFS (Loudness Units relative to Full Scale). This measurement emulates how our perception of relative loudness is affected by the frequency balance and dynamics of a signal.
- A gain change of -6 dB will result in a change of -6 on a LUFS meter
- A gain change of -12 dB will result in a change of -12 on a LUFS meter
- etc...
However, if two signals both appear to be the same level on your DAW's track meters, one will usually sound louder than the other. Signals which show the same level on a LUFS meter will sound about the same loudness as each other.
There are multiple Loudness/LUFS measurements that average over different amounts of time. The key loudness measurements for our purposes are:
- Integrated Loudness: LUFS integrated over the entire song, including the loud and quiet sections
- Short-Term Loudness: LUFS averaged over the last 3 seconds
Treating these different measurements as if they can be used in the same way can lead to confusion and counterproductive mixing/mastering decisions.
Loudness normalisation on music streaming platforms
Music streaming services typically measure the loudness of each song and turn it up or down so that each song sounds about the same loudness overall. This prevents large differences in loudness between songs in a playlist that would have us frequently reaching for the volume control constantly.
They don't all use exactly the same measurement, but they do all use Integrated Loudness or a similar measurement that integrates over the entire song. There can also be different loudness normalisation targets depending on your player settings. However, platforms are converging on normalising to an Integrated Loudness of -14 LUFS by default.
Imagine a song with loud sections and quiet sections. Its Integrated Loudness will be somewhere between the Short-Term Loudness measurements during the quiet and loud sections. So if we want to ensure that a streaming service doesn't need to turn it up or down, we would need to re-run an Integrated Loudness measurement over the entire song each time we adjust our mix/master processing!
If we watch a real-time Short-Term Loudness meter to save time, trying to tweak the mix so that the meter tends to read around -14 all the time, we'll end up with very little loudness contrast between different sections of the song. Sometimes that is what we want, however, it's a choice best made for purely artistic reasons.
Should we mix and master to a loudness target level?
So what do we do? Must we spend time waiting for an Integrated Loudness measurement to run over and over? Would this even be helpful?
Imagine two songs that both measure an Integrated Loudness of -14 LUFS. Song A measures the same loudness all the way through with little contrast between different sections. Song B has large loudness differences between verses and choruses so that the choruses sound particularly exciting and ear-catching (compared to the verses!)

After loudness normalisation, the loud sections of Song B may sound louder, and more impactful, than Song A! There's no right or wrong here, neither is better than the other. What matters is the artistic decision about which experience we want our listeners to have.
A single Integrated Loudness value doesn't help differentiate between or guide towards either of these experiences while mixing and mastering, and the streaming platforms will normalise our music no matter what we do. Therefore focusing on Integrated Loudness doesn't help us make decisions.
There's a faster, easier, and more useful thing to focus on! We can let the streaming services turn our music up or down as much as they need to - they're going to do it anyway - and switch our focus away from "loudness" and onto excitement and impact.
We've seen how two songs that have the same Integrated Loudness value could have large differences in their loudness contrast over time. Two short sections of music that measure the same Short-Term Loudness value can sound more/less exciting, punchy, or tiring based largely on how much transient detail has been left after compression and limiting. Since those characteristics, rather than absolute loudness, are what we care most about, we need another measurement!
Dynamics (PSR) and how to sound competitive
If we want the loudest, most impactful moments of our music to sound impactful and competitive compared to other music, we need a healthy balance between the Peak Level and the Short-Term Loudness. This measurement is often referred to as PSR (Peak to Short-Term Loudness Ratio) and gives a sense of how dynamically compressed/limited the signal is. This is what ListenHub's Dynamics meter shows.
Aim for the loudest sections of the song to have enough Dynamics and transient detail left to sound exciting and impactful but not so much that, once loudness normalised, it sounds weak compared to other music in the genre.
Current Pop, R&B, Hip-Hop, Rock/Metal releases will tend to measure Dynamics of around 8 or 9 at the loudest moments. You can compare commercial reference tracks to your music with ListenHub. See How to use ListenHub → Input and output switching for details.
Extreme compression and limiting, such that Dynamics (PSR) reads very low, tends to result in music that sounds exciting at first but is tiring to listen to. And due to how Integrated Loudness measurements work, it will tend to be turned down more by streaming platforms and hence sound overall quieter than if it had a little more Dynamics!
Hence our general advice:
-
Ensure that the loudest sections of the song are about the same level on ListenHub's Loudness meter, and balance the quieter sections to taste.
For music production, it doesn't matter greatly what this level is because the song will be subject to loudness normalisation later anyway. What matters is consistency.
-
Ensure that the loudest sections show a healthy level of Dynamics for the genre. Generally speaking, compressing and limiting so that ListenHub's Dynamics meter reads yellow for a few seconds is fine - that section of the music will sound loud and impactful. But very low Dynamics for a long time tends to mean that transient detail has been compressed more than necessary.
Spectral analyser
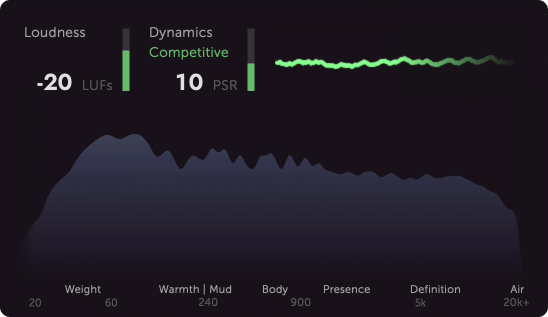
ListenHub's spectral analyser shows the selected input's frequency balance after the Match Input Loudness gain trim is applied, and before Channel Solos, Band Solos, Volume/Dim/Mute, and FX Chains.
Input and output switching
⚠️ Input and output switching are not available when using only the plugin
One of the most useful perceptual resets is to compare your mix/master with other music that either represents the sound you're aiming for or that you are extremely familiar with. When comparing like this it's important for the audio streams to be loudness-matched and for the switching back and forth to be fast and glitch-free. ListenHub helps with both!
Signal routing
Inputs
The ListenHub audio device always has three stereo inputs, over its two audio drivers, even if the hardware audio interface it's sending to has only one stereo output. This means everything continues working the same way if you switch from a studio audio interface with many output channels to built-in speakers/headphones or a smaller audio interface, for example when taking a laptop on the road.
| Input | Audio driver | Channels |
|---|---|---|
| System | ListenHub System | 1&2 |
| DAW 1-2 | ListenHub DAW | 1&2 |
| DAW 3-4 | ListenHub DAW | 3&4 |
⚠️ In your DAW, when ListenHub DAW is selected as your output device, your audio interface’s hardware outputs (from 3&4 onwards) shift to become output channels 5&6 and onwards. If you change your audio interface whilst your DAW is open, and need direct access to the new audio interface's hardware outputs during the session, you may need to close and reopen your DAW to refresh the output channels to reflect the new audio interface.
Audio from music and video player applications (Apple Music, Spotify etc) will stream into ListenHub's System input when ListenHub System is selected as your system audio's output device. Audio from your DAW will stream into ListenHub's DAW 1-2 input by default when ListenHub DAW is selected as your DAW's output device. See How to change your DAW mix bus output channels if you aren't sure how to do this.
You can use ListenHub's DAW 3-4 input for a reference track in your DAW by routing that track's output to outputs 3&4.
Outputs
| Output | Channels |
|---|---|
| Main | 1&2 |
| Alt | Configurable (disabled by default) |
If your audio interface has multiple stereo outputs and you have a second pair of studio speakers or headphones, enable the Alt output by selecting which output channels it should send to in ListenHub's preferences page
Match Input Loudness

Tap the Match button to match the loudness of all three inputs, applying custom gain to each one. Tap again to un-match, returning each input's gain to 0 dB.

The Update button will flash slowly if the loudness of any input drifts away from -20. Tap Update to match them again.
The inputs are matched by trimming each to -20 LUFS (short-term) so that an unmastered mix is unlikely to overload ListenHub's output after being matched. This LUFS level can be adjusted in the preferences page
Match Input Loudness is useful even when you are only using one of ListenHub's inputs, for example when using only the plugin. Enabling Match or tapping Update will trim the output to -20 LUFS, or the chosen level in the Preferences page. Thus, whenever Match is enabled you will be hearing a consistent level from your speakers or headphones.
See Metering for more information about Loudness and LUFS.
Channel solo
When balancing levels
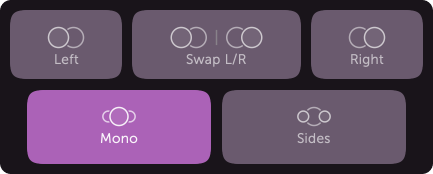
It can be easier to focus on listening for when something is not quite right than to decide when it is just right. Try switching Mono on and off while listening to the full mix. In Mono, hard-panned instruments and vocals will become slightly quieter. If the centre-panned lead vocals, bass, and lead rhythmic elements are not the loudest things in the mix in Mono, they're probably a little too quiet overall.
Aim for hard-panned elements to be slightly too quiet, and centre-panned elements to be slightly too loud in Mono.
When cleaning up overlaps and masking
Try balancing levels at Soft volume, perhaps even with Dim enabled. If every word of the vocals, and every driving rhythmic event, isn't audible in Mono, chances are that those elements will benefit from volume automation or cleaning up some frequency overlaps with other elements. See Claro → Overlap metering and masking for more!
When checking stereo balance
After working on a mix for a while we become accustomed to differences in frequency balance between the left and right. Toggling Swap L/R is a very quick way to reset your ears, sometimes revealing that what has sounded balanced for the last few hours is leaning to one side or the other in some parts of the spectrum.
While adjusting faders and EQs to re-balance the stereo image, try switching back and forth between only the Left and Right solos. The soloed channel is centred in the stereo image, instead of just soloing the left or right speaker, making small imbalances much easier to hear.
Try soloing the Sides when thinking about mono-compatibility and tweaking the low-end balance of hard-panned elements. Soloing the Sides effectively mutes elements that are the same on the left and right, allowing you to hear hard-panned elements more clearly. This can be faster than searching through the DAW mixer for tracks to solo.
Options: Solo in place vs in the centre

By default, Left and Right are soloed in the centre instead of in-place on only the left/right speaker. As mentioned above, this makes small differences between them easier to hear when switching back and forth. You may prefer to solo in-place when soloing speakers for acoustic measurements and calibration.
Normally, auditioning Sides subtracts the left and right channels, resulting in a mono signal that is auditioned in the centre. ListenHub's default behaviour when Sides is enabled is:
- Sides left = Left - Right
- Sides right = Right - Left
This results in a stereo signal that can be less jarring to switch to from a full stereo mix.
⚠️ However, it is still simply subtracting the left and right channels rather than removing the phantom centre, since the latter requires a more complex process and additional latency. Therefore it is not a reliable guide for whether frequency content that's audible with Sides enabled is panned towards the left or the right. Whether to solo Sides in place vs in the centre is best considered a personal preference.
The in-place vs in the centre behaviour for Left, Right, and Sides can be changed in the preferences page
Band solo
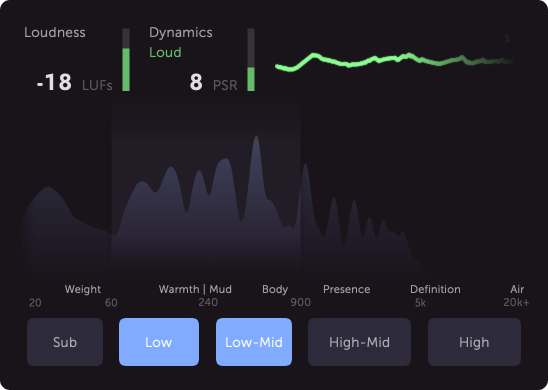
Solo different frequency ranges across the spectrum to hear, for example
- whether the energy from some elements is distracting from the leading elements in that range, and adjust their relationship without being distracted by the rest of the mix
- how solid the low end sounds without the Sub frequency content
When comparing your mix with commercial music and other reference tracks (see Input and output switching), you may notice that while your mix sounds similarly balanced across the spectrum, it has less clarity and is more tiring at the same time. The Band Solo buttons can be used to hear:
- whether the Low or Low-Mid of your mix sounds inherently muddy or boxy, and only sounds comfortable when the high end is present
- whether the High-Mid or High of your mix sounds inherently harsh or tiring, and only sounds comfortable when the low end is present
This is a sign that there may be excessive resonances or overlaps between elements in those frequency ranges. Being able to quickly zoom in and out makes hearing and resolving such things much easier. See How to use Claro → Resonances and How to use Claro → Overlap metering and masking for information about how to approach this with the Sonnox Claro EQ.
Band solo dim level

Using Band Solo on mobile phones
The Band Solo buttons are hidden by default when the mobile app is used in portrait mode on small screens. Tap the Band Solo button to view them.
FX Chains
⚠️ FX chains are only available when using ListenHub's audio devices, and are managed in the ListenHub desktop application that runs in your system menu bar. Only Audio Unit (AU) plugins are supported.
ListenHub lets you add an FX Chain of up to three plugins to either the Main or the Alt output, or both! This is particularly useful for speaker/room calibration and emulation processing. Hosting a plugin on ListenHub's output(s) instead of in your DAW means that:
- There is zero risk of accidentally including the correction or emulation processing in your bounced mixes/masters
- You can easily monitor system audio (Spotify etc.) through the same correction/emulation processing that you use for mixing
If the tool you're using already has a "system-wide" audio device, similar to ListenHub, there are still benefits to using it as a plugin in ListenHub instead:
- Use custom processing for each pair of speakers, or speakers vs headphones, without needing to open a window on your computer and click around to switch back and forth between presets.
- Combine calibration and emulation processing, for example using Sonarworks headphone calibration and Goodhertz Canopener cross-feed at the same time.
Using FX Chains
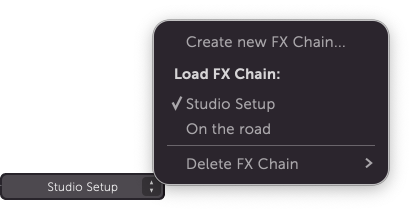
The FX Chains button and the plugin slots in the FX Chain window work just like a plugin slot in many DAWs: Click the name to open the window, click the arrows to select a different FX Chain or plugin.
To get started, open the desktop window by clicking the ListenHub icon ![]() in the menu bar and click
in the menu bar and click  . You'll see the FX Chain window. Give the FX Chain a name and, if you're changing between output audio devices, select which audio device to use the FX Chain with. ListenHub will load that FX Chain for you when the device is plugged in.
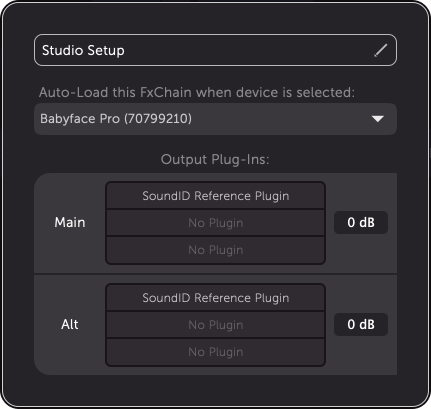
Click "No Plugin" to open the plugin menu and select a plugin. Each plugin is scanned the first time it's used, to ensure it's stable, so the plugin window will take a second or so to open. In future, the plugin will insert and open quickly.
There's no need to save. Just click off the window to close it. New FX Chains can be created and loaded by clicking the arrows next to the name of the current FX Chain.
Compensating for loudness differences caused by plugin processing
Room/speaker correction processing often applies some gain attenuation to prevent increased peak levels, caused by the processing, to clip your audio interface. If you're using different correction processing for different speakers, this can result in either the Main or Alt output sounding louder. In this case, turn the gain control of the louder output down a little instead of adjusting the gain on your speakers.
Plugin scanning
ListenHub shallow-scans new plugins when the menu bar app is launched. This scan builds the plugin menu in the FX Chain window. The first time a plugin is inserted, it is scanned more deeply to ensure stability.
If you install a new plugin, or a new version of a plugin, whilst ListenHub is running in the menu bar, this will trigger ListenHub to automatically re-scan for new plugins and update its plugin list.
If you update or uninstall a plugin which is in ListenHub’s FX chain, while listening to audio, ListenHub will mute, re-scan your installed plugins, reload the FX chain accordingly, then unmute audio.
Plugin buffer size
Just like your DAW, plugins in ListenHub process in blocks of audio samples instead of sample-by-sample. Generally speaking, the larger the buffer/block size, the smaller the CPU use of the processing.
If you ever hear the audio on your system glitch when using ListenHub, try clicking on the menu bar icon ![]() and selecting a larger buffer size.
and selecting a larger buffer size.
Loopback
⚠️ Loopback is only available when using one of ListenHub's audio drivers as your DAW's input and output device
Just like many hardware audio interfaces, ListenHub includes a stereo "loopback" feature that lets you route audio output from one application to the input of another. For example, this lets you record Spotify music in your DAW to then use as a reference track.
To use the loopback feature for this example, you would need to do the following:
- Have ListenHub DAW selected as your input and output device in your DAW
- In ListenHub's preferences page, make sure the loopback source is set to "System"
- Select a track to use in your DAW
- Set the track's record input to "Loopback Left / Loopback Right"
Now, all audio playing on your computer will flow into that track.
⚠️ Be careful if you use the loopback feature to record audio from your DAW back into the DAW, as there is the potential to cause feedback loops.
Audio device vs Plugin
There are two reasons why you might decide to use the plugin instead of, or in addition to, the audio device.
- If you need to record from your audio interface inputs and your DAW doesn't allow the use of different hardware audio devices for sound input and sound output
- If you need to record from your audio interface inputs and cannot tolerate the small amount of additional latency added by the ListenHub audio device
Using only the plugin
Insert the plugin in the final slot of your mix/master bus. Or, if your DAW allows it, insert the plugin after the mix/bounce bus to ensure that your monitor control processing cannot affect your bounced mixes.
See How to use a listen bus in your DAW if you aren't sure how to do this.
⚠️ Keep your DAW output device set to your hardware audio interface.
The ListenHub plugin will bypass itself when your DAW is bouncing/rendering a mix to file. However, this does not work in all DAWs. See Compatibility for details.
Using the plugin and macOS audio device at the same time
- Use the ListenHub System audio device for system sound as per Quick Start → System-wide setup
- ⚠️ Keep your DAW output device set to your hardware audio interface
- Insert the plugin as above
When the ListenHub plugin and audio device are both being used, the plugin appears as a fourth input to select.
In this setup, your DAW audio is not passed through ListenHub's audio device. Since the plugin has zero latency, your round-trip latency remains the same. Selecting the System, DAW 1-2, or DAW 3-4 inputs mutes the ListenHub plugin output, and vice versa.